An Introduction To Secure Software Development
While DevOps is the set of practices that bring together software development (Dev) and IT operations (Ops), a rather new approach is DevSecOps, which aims to bring together software development (Dev), security (Sec), and IT operations (Ops). It is an extension of both the DevOps philosophy and the “shift left” approach to software development, where you want to move tasks, activities, and processes earlier in the software development lifecycle (SDLC), closer to the initial phases of planning and coding, thereby reducing the likelihood of defects, improving code quality, and accelerating the delivery process. The shift left approach also aims to change how security activities are performed during SDLC, incorporating it into the software development process rather than treating it as a separate step or an afterthought.
This is my attempt to document how to build a basic DevSecOps pipeline, incorporating the various elements of it – from continuous integration to continuous delivery, and of course, security.
01: Building the application
Let’s start with building the application that would be the cornerstone of this exercise. I’m creating a simple Nodejs app, with one GET endpoint and one POST endpoint, so that we cover at least the basics. The GET endpoint returns a simple message when called, while the POST endpoint returns the hypotenuse of a right triangle when provided with the lengths of the other two sides.
We begin by setting the project up, which requires initializing npm at the root of our directory. This creates the package.json file in the directory, which specifies, essentially, the metadata for the project and, of course, all its dependencies.
┌──(thatvirdiguy㉿kali)-[~/devsecops-example]
└─$ npm init -y
Wrote to /home/kali/devsecops-example/package.json:

{
  "name": "devsecops-example",
  "version": "1.0.0",
  "description": "WIP",
  "main": "index.js",
  "scripts": {
	"test": "echo \"Error: no test specified\" && exit 1"
  },
  "repository": {
	"type": "git",
	"url": "git+https://github.com/thatvirdiguy/devsecops-example.git"
  },
  "keywords": [],
  "author": "",
  "license": "ISC",
  "bugs": {
	"url": "https://github.com/thatvirdiguy/devsecops-example/issues"
  },
  "homepage": "https://github.com/thatvirdiguy/devsecops-example#readme"
}
Speaking of dependencies, our project is going to need express, to support the web application capabilities we are looking for, and mathjs, to support the arithmetic operations we would employ.
┌──(thatvirdiguy㉿kali)-[~/devsecops-example]
└─$ npm install express mathjs

added 73 packages, and audited 74 packages in 12s

13 packages are looking for funding
  run `npm fund` for details

found 0 vulnerabilities
Let’s start building the application now by creating a new file, app.js. We initialise the libraries–
const express = require('express');
const math = require('mathjs');
const app = express();
–and specify the port on which we want the application to listen to.
const port = process.env.PORT || 8080;
app.listen(port, () => {
  console.log(`API server listening on port ${port}`);
});
This takes care of the core of the web application. Let’s move on to building the GET endpoint, which returns the standard “Hello, World!” message when called.
app.get('/', (req, res) => {
	res.send(`Hello, World!`);
});
This has been directly lifted from the express package documentation mentioned earlier.
Let’s test this out now.
┌──(thatvirdiguy㉿kali)-[~/devsecops-example]
└─$ node app.js
API server listening on port 8080
Opening port 8080 on our localhost gives us:

Well, that seems to work as expected.
For the POST endpoint, we need to provide the application with the values for the two sides of the triangle based on which it will calculate the hypotenuse. This can be done by passing them in the request body.
app.post('/pythagoras', (req, res) => {
  const a = req.body.a
  const b = req.body.b
Notice that we are calling the POST endpoint “/pythagoras”.
Then, we will use the mathjs library to calculate the hypotenuse using the Pythagorean Theorem–
const c = math.sqrt(math.pow(a, 2) + math.pow(b, 2));
–before returning the result in JSON format.
res.status(200).json({
	hypotenuse: c
  });
I would recommend putting an app.use(express.json()); before the POST endpoint definition because as this tutorial tells us–
Express doesn’t parse HTTP request bodies by default, but it does have a built-in middleware that populates the req.body property with the parsed request body. For example, app.use(express.json()) is how you tell Express to automatically parse JSON request bodies for you.
I learnt this after a lot of trial and error, that I wouldn’t wish on anyone else!
Let’s test the POST endpoint now with a curl. You can use tools like Postman for the same as well, but do ensure that your app is running–
┌──(thatvirdiguy㉿kali)-[~/devsecops-example]
└─$ node app.js
API server listening on port 8080
–and you are calling the right endpoint.
┌──(thatvirdiguy㉿kali)-[~/devsecops-example]
└─$ curl -X POST -H "Content-Type: application/json" -d '{"a": 3, "b": 4}' http://localhost:8080/pythagoras

{"hypotenuse":5}
Perfect. That’s the foundation done, then.
02: Containerizing the application
Currently, our application works in the local environment. But, to allow external users to be able to connect and use our application, we would need to put it out in the world. The easiest way to do this is to put it on cloud, employing the services of a public cloud service provider like AWS or Azure. For this exercise, I am using Google Cloud.
Let’s start by containerizing our application using Docker. The first step to this is writing the Dockerfile, which is “a text document that contains all the commands a user could call on the command line to assemble an image.” Our Dockerfile looks like the following:
┌──(thatvirdiguy㉿kali)-[~/devsecops-example]
└─$ cat Dockerfile
FROM node:18-alpine

EXPOSE 8080

RUN mkdir -p /home/node/app/node_modules

WORKDIR /home/kali/devsecops-example

COPY . .

RUN npm install

RUN chown -R node:node .

USER node

CMD [ "node", "app.js" ]
Here, we are:
- using node:18-alpine as the base image, getting it from the official DockerHub repository
- informing Docker that the container listens on port 8080 at runtime
- running a simple bash command that creates the directory needed for node modules
- specifying a working directory for the following commands in the Dockerfile
- copying the entire project recursively into the container for the build
- running the install command for node
- creating a new user called “node”
- switching to the newly created user
- running, essentially, node app.js to run the application
Let’s build a docker image from this Dockerfile. I’m going to name it the same as my GitHub repository and tag it with “1.0.0” so as to specify that this is v1 of this Docker image.
┌──(thatvirdiguy㉿kali)-[~/devsecops-example]
└─$ docker build -t devsecops-example:1.0.0 .
Sending build context to Docker daemon  16.11MB
Step 1/9 : FROM node:18-alpine
 ---> 1646380c3156
Step 2/9 : EXPOSE 8080
 ---> Using cache
 ---> 3551c70be336
Step 3/9 : RUN mkdir -p /home/node/app/node_modules
 ---> Using cache
 ---> 339c7f969e1d
Step 4/9 : WORKDIR /home/kali/devsecops-example
 ---> Running in ab81c7a918b1
Removing intermediate container ab81c7a918b1
 ---> 6c5947193dc8
Step 5/9 : COPY . .
 ---> 2866b0d3efca
Step 6/9 : RUN npm install
 ---> Running in 82a191192ad8

up to date, audited 74 packages in 2s

13 packages are looking for funding
  run `npm fund` for details

found 0 vulnerabilities
Removing intermediate container 82a191192ad8
 ---> 87e78362bdb4
Step 7/9 : RUN chown -R node:node .
 ---> Running in 5165aa25d363
Removing intermediate container 5165aa25d363
 ---> b07a2035b8e1
Step 8/9 : USER node
 ---> Running in ebdcb5aefdad
Removing intermediate container ebdcb5aefdad
 ---> f757ff575a19
Step 9/9 : CMD [ "node", "app.js" ]
 ---> Running in 3578b36acb96
Removing intermediate container 3578b36acb96
 ---> 2dd78858a425
Successfully built 2dd78858a425
Successfully tagged devsecops-example:1.0.0
Let’s test this out before proceeding further.
┌──(thatvirdiguy㉿kali)-[~/devsecops-example]
└─$ docker run -p 8080:8080 -t devsecops-example:1.0.0
API server listening on port 8080
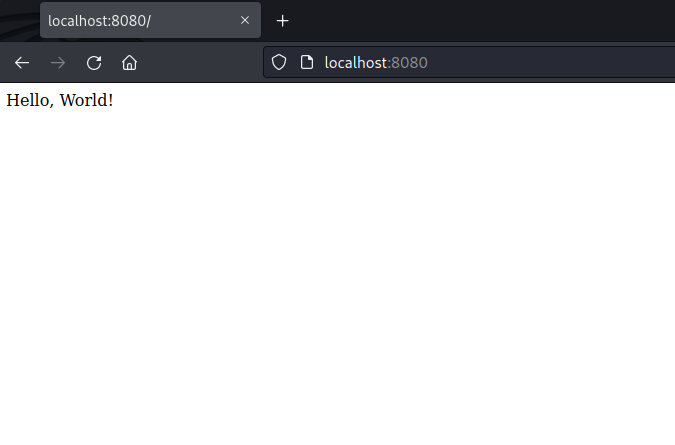
Our container seems to be working as expected! You can also get a list of containers with the following command:
┌──(thatvirdiguy㉿kali)-[~]
└─$ docker ps
CONTAINER ID   IMAGE                 	COMMAND              	CREATED      	STATUS      	PORTS                                   	NAMES
30357b98043d   devsecops-example:1.0.0   "docker-entrypoint.s…"   43 seconds ago   Up 41 seconds   0.0.0.0:8080->8080/tcp, :::8080->8080/tcp   elastic_noether
03: Connecting to the cloud
Now that we have our application in a neat little container, it’s time to actually connect to the cloud. I’ll be predominantly using the gcloud CLI for this exercise. Refer to the documentation for the install installations to set up gcloud CLI.
Once that is done, you might want to, additionally, configure the CLI. For example, I had to set the project that I want to use as the default for every command I run via the gcloud CLI–
┌──(thatvirdiguy㉿kali)-[~/devsecops-example]
└─$ gcloud config set project thatvirdiguy-test-gcp-project
WARNING: You do not appear to have access to project [thatvirdiguy-test-gcp-project] or it does not exist.
Are you sure you wish to set property [core/project] to thatvirdiguy-test-gcp-project?

Do you want to continue (Y/n)?  y

Updated property [core/project].


To take a quick anonymous survey, run:
  $ gcloud survey
–and then allow gcloud to use Docker.
┌──(thatvirdiguy㉿kali)-[~/devsecops-example]
└─$ gcloud auth configure-docker
WARNING: Your config file at [/home/thatvirdiguy/.docker/config.json] contains these credential helper entries:

{
  "credHelpers": {
	"gcr.io": "gcloud",
	"us.gcr.io": "gcloud",
	"eu.gcr.io": "gcloud",
	"asia.gcr.io": "gcloud",
	"staging-k8s.gcr.io": "gcloud",
	"marketplace.gcr.io": "gcloud"
  }
}
Adding credentials for all GCR repositories.
WARNING: A long list of credential helpers may cause delays running 'docker build'. We recommend passing the registry name to configure only the registry you are using.
gcloud credential helpers already registered correctly.
It’s time to push our docker image to Google Cloud. But, before we do that, let’s ensure that our Docker image is tagged properly.
┌──(thatvirdiguy㉿kali)-[~/devsecops-example]
└─$ docker tag devsecops-example:1.0.0 gcr.io/thatvirdiguy-test-gcp-project/devsecops-example:1.0.0
Once this is done, you can simply upload the image to Google Cloud’s Container Registry with the following command:
┌──(thatvirdiguy㉿kali)-[~/devsecops-example]
└─$ docker push gcr.io/thatvirdiguy-test-gcp-project/devsecops-example:1.0.0
The push refers to repository [gcr.io/thatvirdiguy-test-gcp-project/devsecops-example]
4457e96c7553: Pushed
51710d6a8afe: Pushed
9f5d448ebb4f: Pushed
31f85477bbc7: Pushed
f798681d08a2: Pushed
bf8e7ba567f1: Layer already exists
424cc6c20191: Layer already exists
5153e8c603ed: Layer already exists
9fe9a137fd00: Layer already exists
1.0.0: digest: sha256:6f425535831fc3a7f239c00614b03fc93cf781ac6a7061ec7b1e2e075d52dffa size: 2204
(Note: You might need to enable Container Registry API on the Google Cloud console for this step.)
Finally, you can verify if your Docker image is actually there in Container Registry via the Google Cloud console.
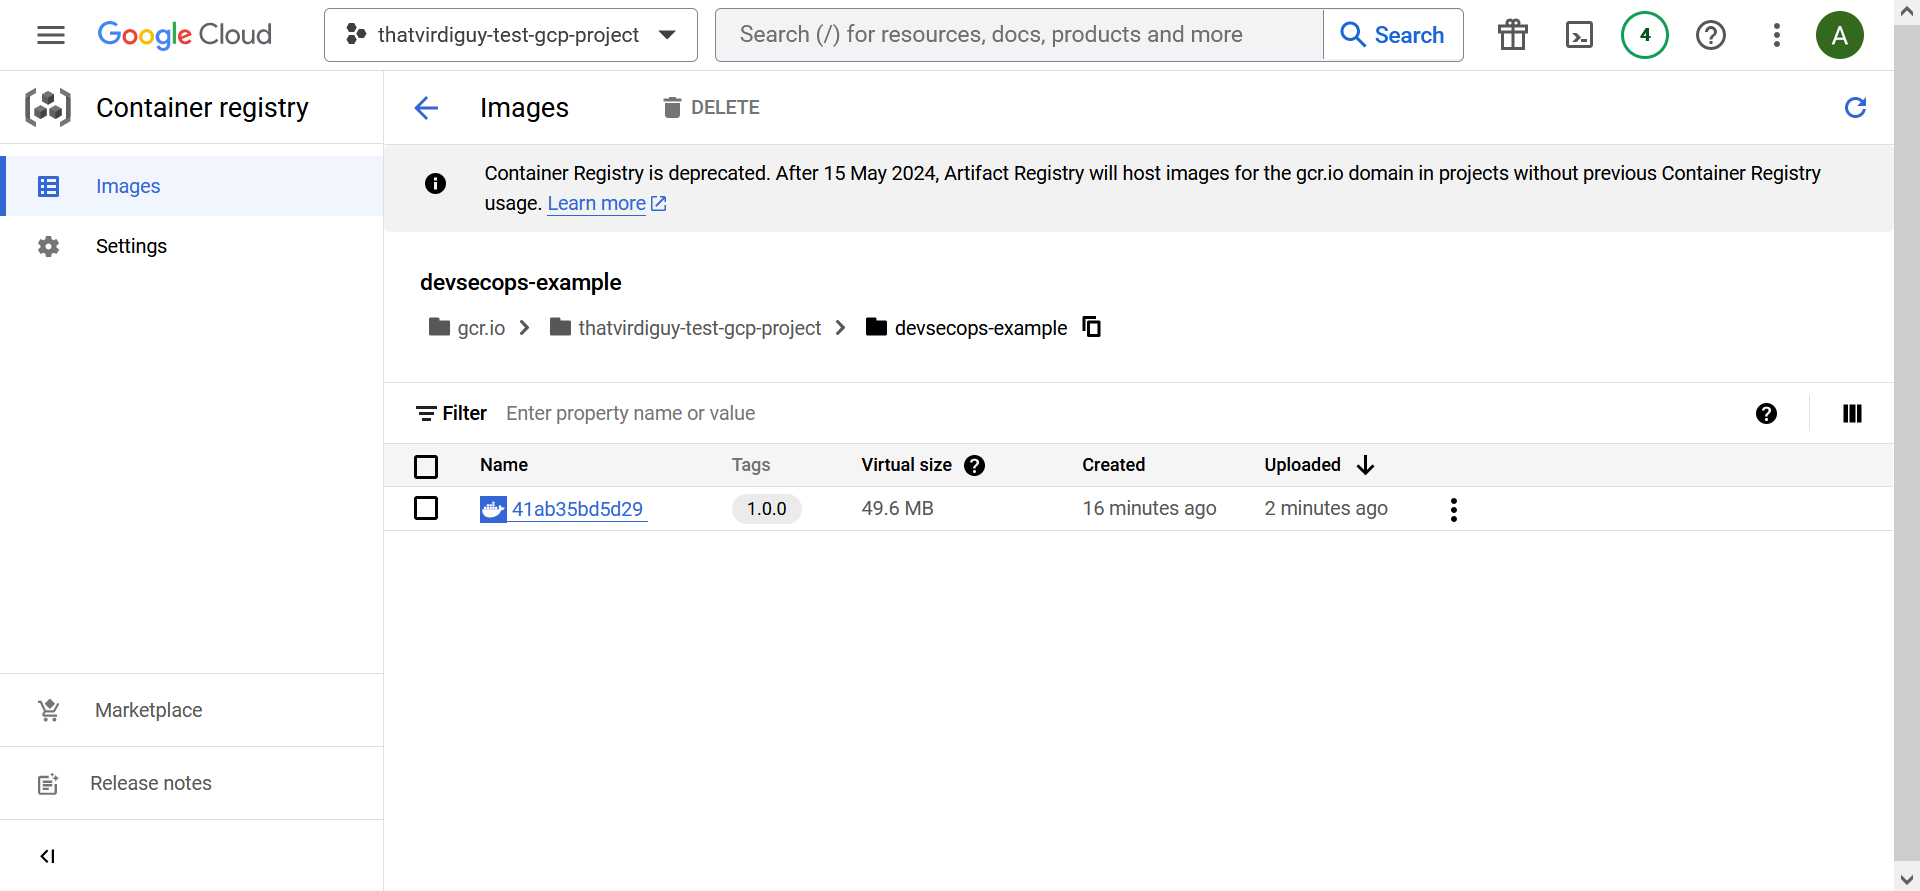
Now, to deploy a web application in Google Cloud off this Docker image, we are going to use Cloud Run. The following gcloud command uses the Docker image we specify to deploy a Cloud Run service in the europe-west-1 region. Additionally, we are taking the full advantages of the serverless capabilities of Cloud Run by specifying “--platform managed”.
┌──(thatvirdiguy㉿kali)-[~/devsecops-example]
└─$ gcloud run deploy --image gcr.io/thatvirdiguy-test-gcp-project/devsecops-example:1.0.0 --region europe-west1 --platform managed
Service name (devsecops-example):
Allow unauthenticated invocations to [devsecops-example] (y/N)?  y

Deploying container to Cloud Run service [devsecops-example] in project [thatvirdiguy-test-gcp-project] region [europe-west1]
✓ Deploying new service... Done.
  ✓ Creating Revision...
  ✓ Routing traffic...
  ✓ Setting IAM Policy...
Done.
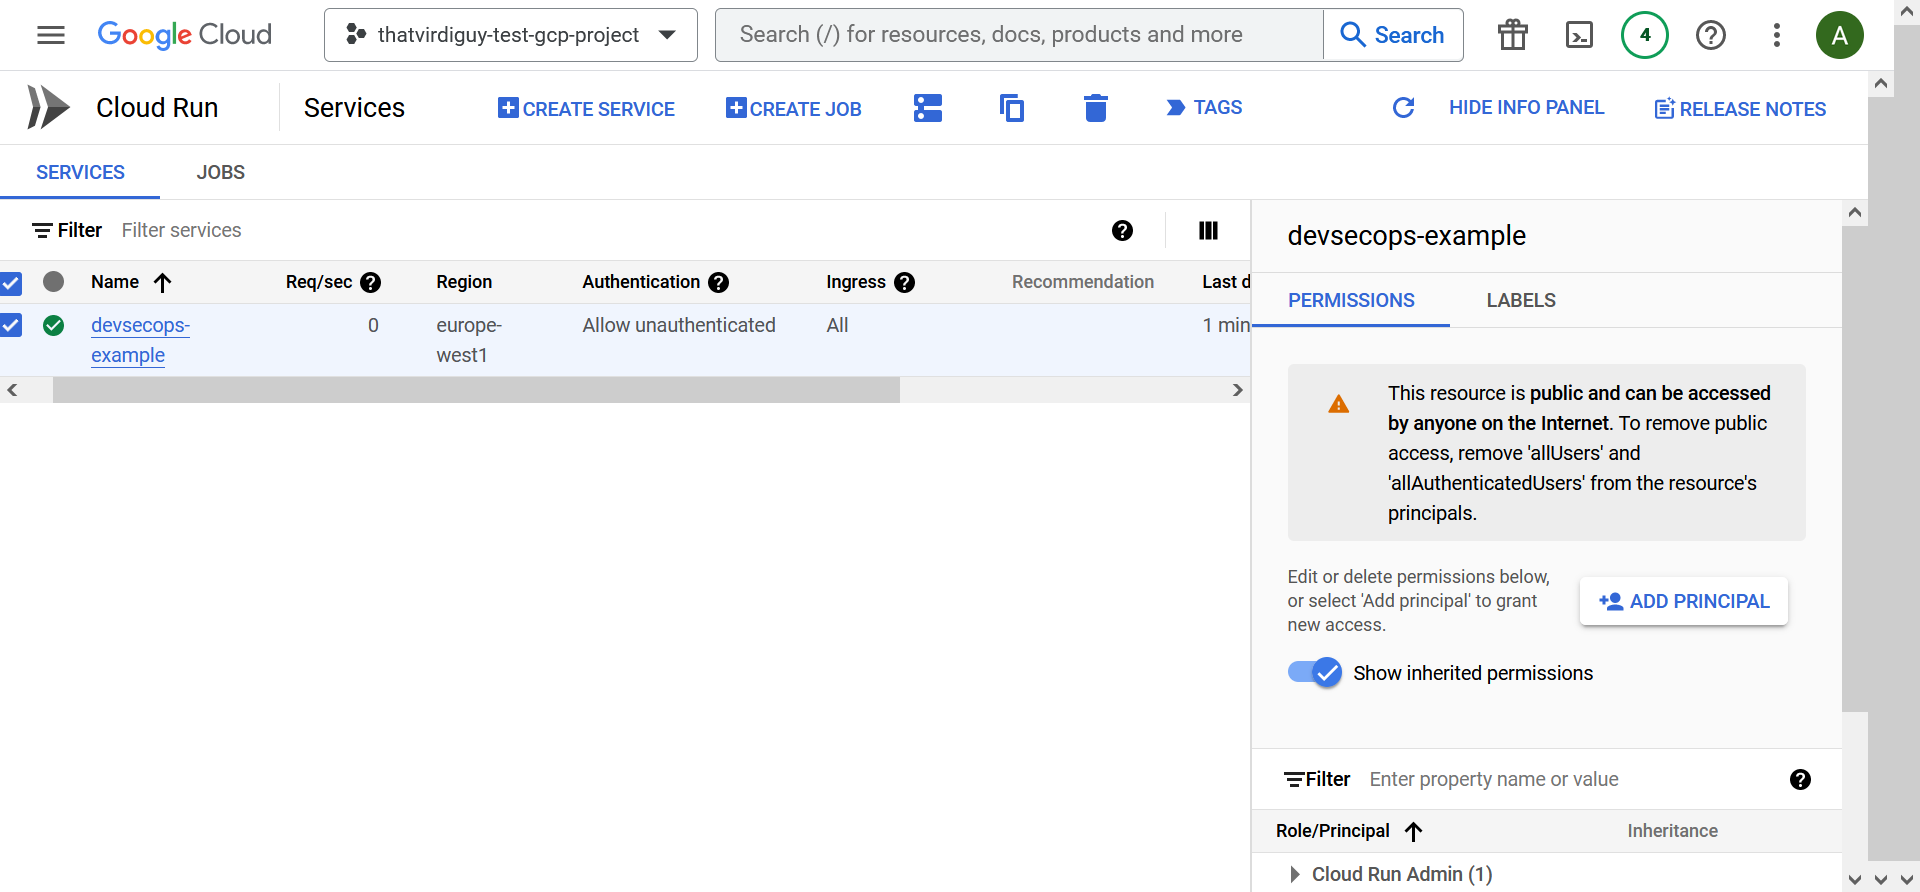
Service [devsecops-example] revision [devsecops-example-00001-8dl] has been deployed and is serving 100 percent of traffic.
Service URL: https://devsecops-example-bquuzmv2ca-ew.a.run.app
Note that I was prompted to pick the service name, enable Cloud Run API in my project, and whether I want to enable unauthenticated invocations to this service. I selected yes for the last bit, although, of course, unauthenticated invocations to a web application might not necessarily follow security best practices.
04: Continuous Delivery
We have deployed the application, we are connected to the cloud, but so far we have been building things manually. To enable Continuous Delivery, one of the pillars of DevSecOps, we need to set our build process in such a way that the manual is replaced by automation. To do this in Google Cloud, we will be using Cloud Build.
With Cloud Build, you can define entire pipelines using a YAML file, providing a streamlined and low-maintenance approach to creating and managing your build processes. Our cloudbuild.yaml file–
┌──(thatvirdiguy㉿kali)-[~/devsecops-example]
└─$ cat cloudbuild.yaml
steps:

  - id: "build docker image"
	name: "gcr.io/cloud-builders/docker"
	timeout: 600s
	args:
  	- "build"
  	- "-t"
  	- "gcr.io/$PROJECT_ID/devsecops-example:$SHORT_SHA"
  	- "."

  - id: "push docker image to GCP Container Registry"
	name: "gcr.io/cloud-builders/docker"
	timeout: 600s
	args:
  	- "push"
  	- "gcr.io/$PROJECT_ID/devsecops-example:$SHORT_SHA"

  - id: "deploy application on Cloud Run"
	name: "gcr.io/cloud-builders/gcloud"
	timeout: 600s
	args:
  	- "run"
  	- "deploy"
  	- "ssdlc-example"
  	- "--platform"
  	- "managed"
  	- "--image"
  	- "gcr.io/$PROJECT_ID/devsecops-example:$SHORT_SHA"
  	- "--region"
  	- "europe-west1"
  	- "--memory"
  	- "1Gi"
  	- "--cpu"
  	- "2"
  	- "--allow-unauthenticated"
–essentially consists of three steps: building the Docker image, pushing it to Container Registry, and deploying a Cloud Run service off that Docker image. Note how these are the same steps we followed when we deployed the Cloud Run service for the first time. With this YAML file, we have automated those steps.
However, we have not achieved full automation yet.
Once we have pushed cloudbuild.yaml to the main branch of your repo, we need to create a trigger to ensure that every time a code is pushed to our repo, a build will start automatically. Refer to the documentation to create and manage build triggers.
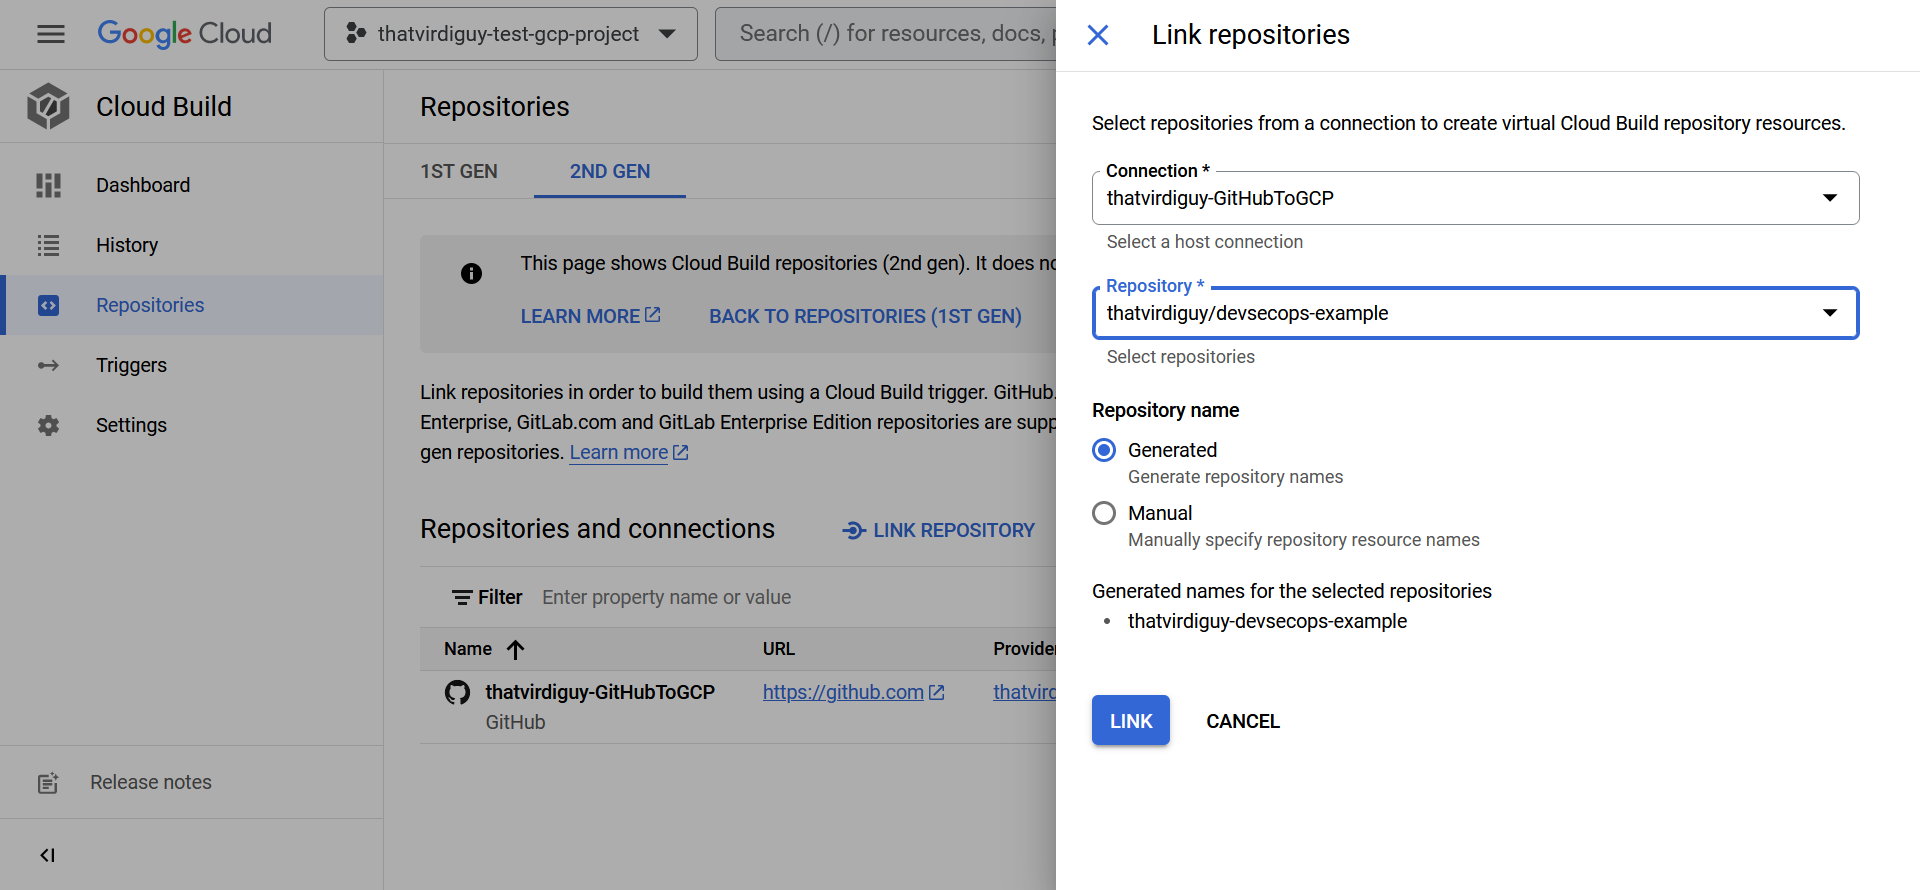
Long story short, I had to link my GitHub repository with Cloud Build–
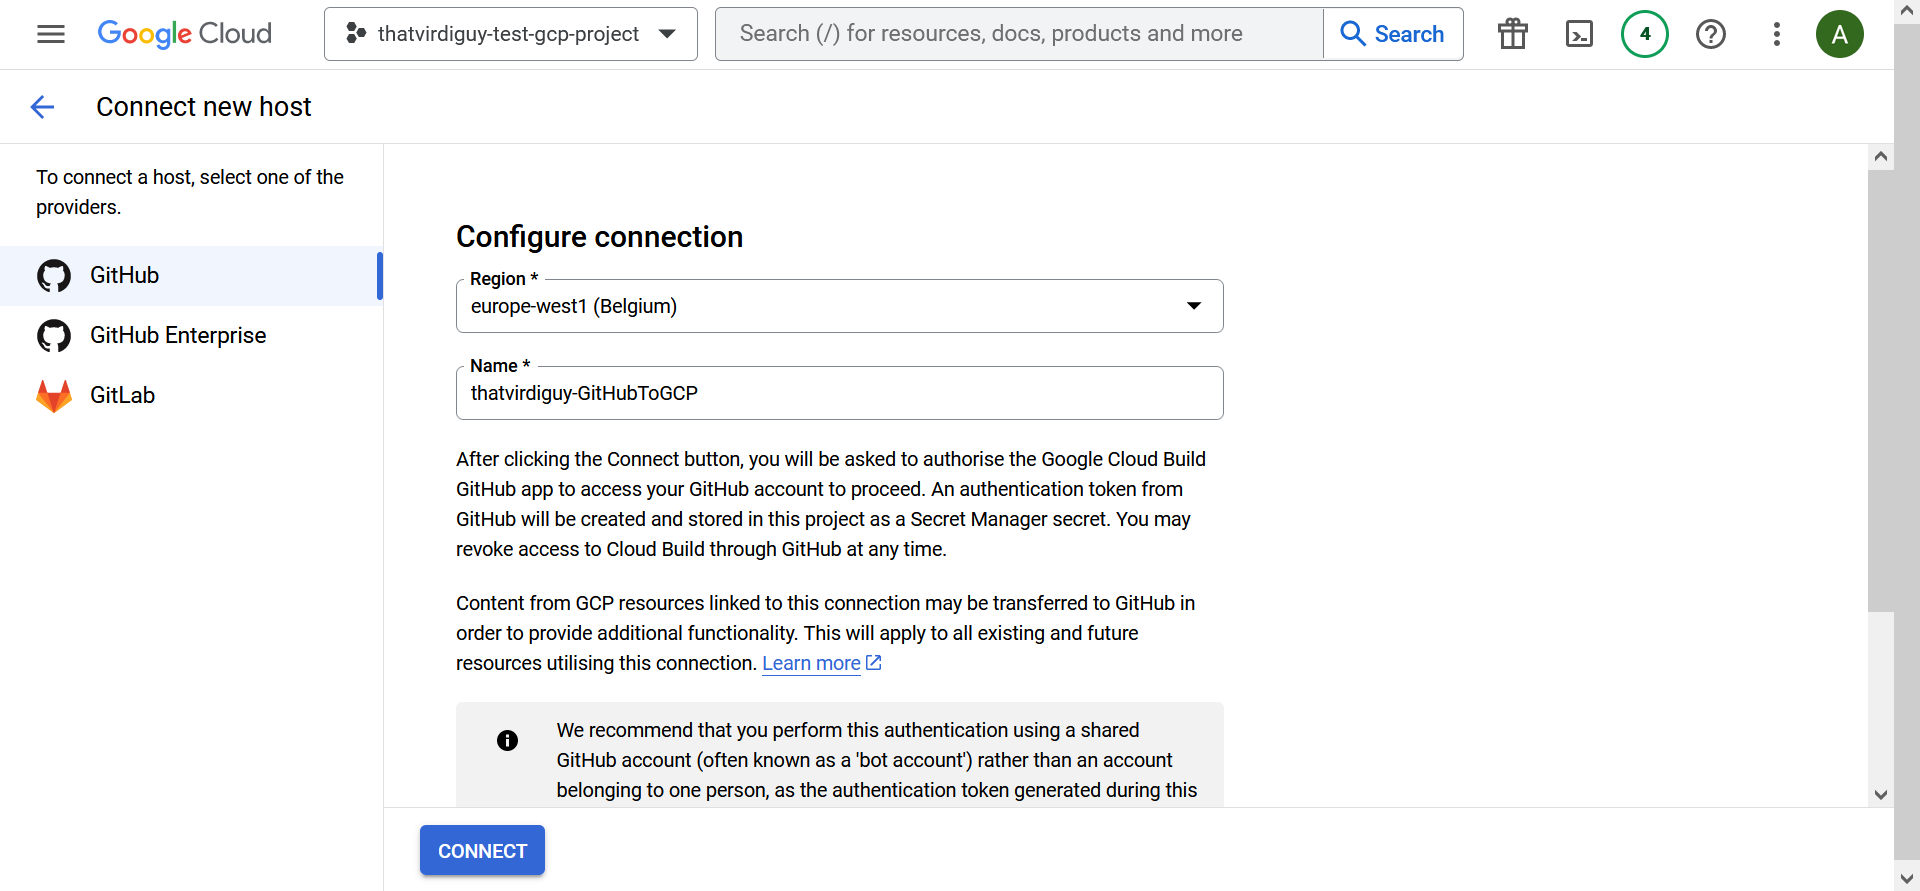
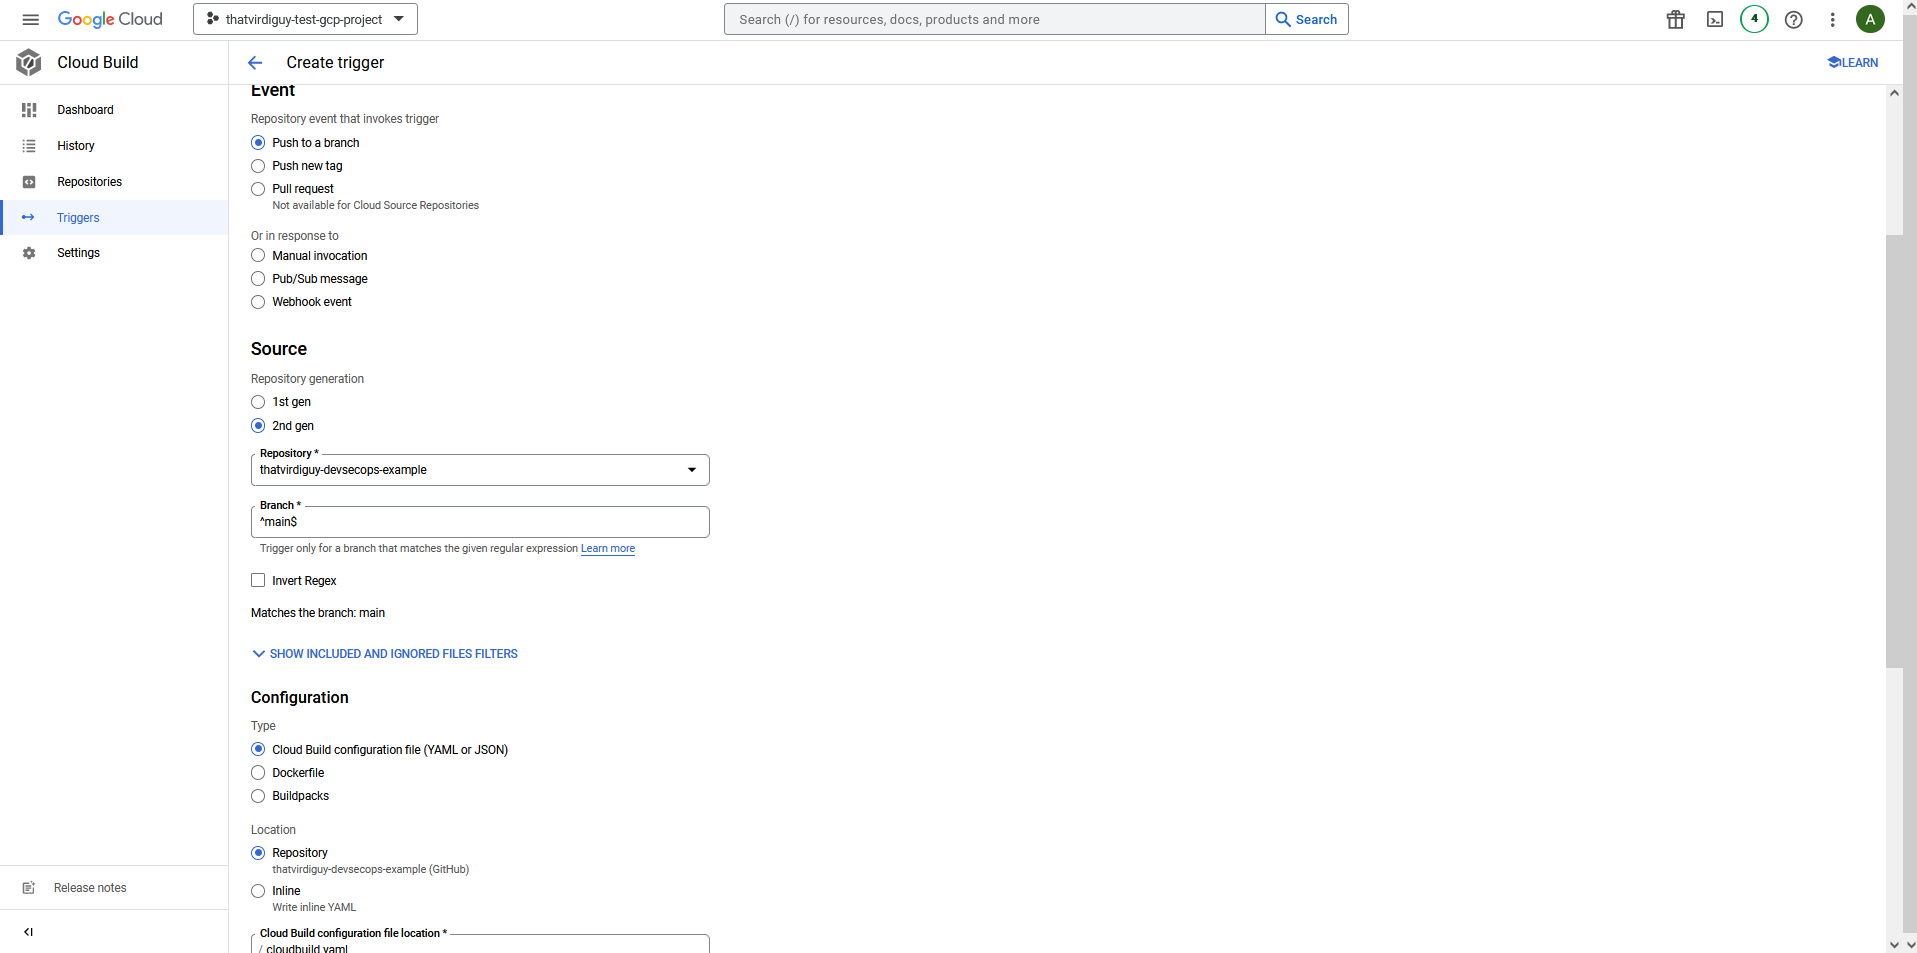
–and define a trigger to start the build using the Cloud Build configuration file every time there is a push to the main branch of the repo.
Once you have the trigger in place, you might want to test it. I made a simple change to my README.md file–
┌──(thatvirdiguy㉿kali)-[~/devsecops-example]
└─$ vim README.md
┌──(thatvirdiguy㉿kali)-[~/devsecops-example]
└─$ cat README.md
WIP v2
–and pushed it to my repo.
┌──(thatvirdiguy㉿kali)-[~/devsecops-example]
└─$ git add README.md

┌──(thatvirdiguy㉿kali)-[~/devsecops-example]
└─$ git commit -m "test for cloud build trigger"
[main 167a180] test for cloud build trigger
 1 file changed, 1 insertion(+), 1 deletion(-)

┌──(thatvirdiguy㉿kali)-[~/devsecops-example]
└─$ git push -u origin main
Enumerating objects: 5, done.
Counting objects: 100% (5/5), done.
Delta compression using up to 2 threads
Compressing objects: 100% (2/2), done.
Writing objects: 100% (3/3), 278 bytes | 278.00 KiB/s, done.
Total 3 (delta 1), reused 0 (delta 0), pack-reused 0
remote: Resolving deltas: 100% (1/1), completed with 1 local object.
To github.com:thatvirdiguy/devsecops-example.git
   5f49abd..91a6b8d  main -> main
branch 'main' set up to track 'origin/main'.
However, I kept getting the following errors:
Already have image (with digest): gcr.io/cloud-builders/gcloud ERROR: (gcloud.run.deploy) PERMISSION_DENIED: Permission ‘run.services.get’ denied on resource ‘namespaces/thatvirdiguy-test-gcp-project/services/devsecops-example’ (or resource may not exist).
Already have image (with digest): gcr.io/cloud-builders/gcloud Deploying container to Cloud Run service [devsecops-example] in project [thatvirdiguy-test-gcp-project] region [europe-west1] Deploying… failed Deployment failed ERROR: (gcloud.run.deploy) PERMISSION_DENIED: Permission ‘iam.serviceaccounts.actAs’ denied on service account 893177753769-compute@developer.gserviceaccount.com (or it may not exist).
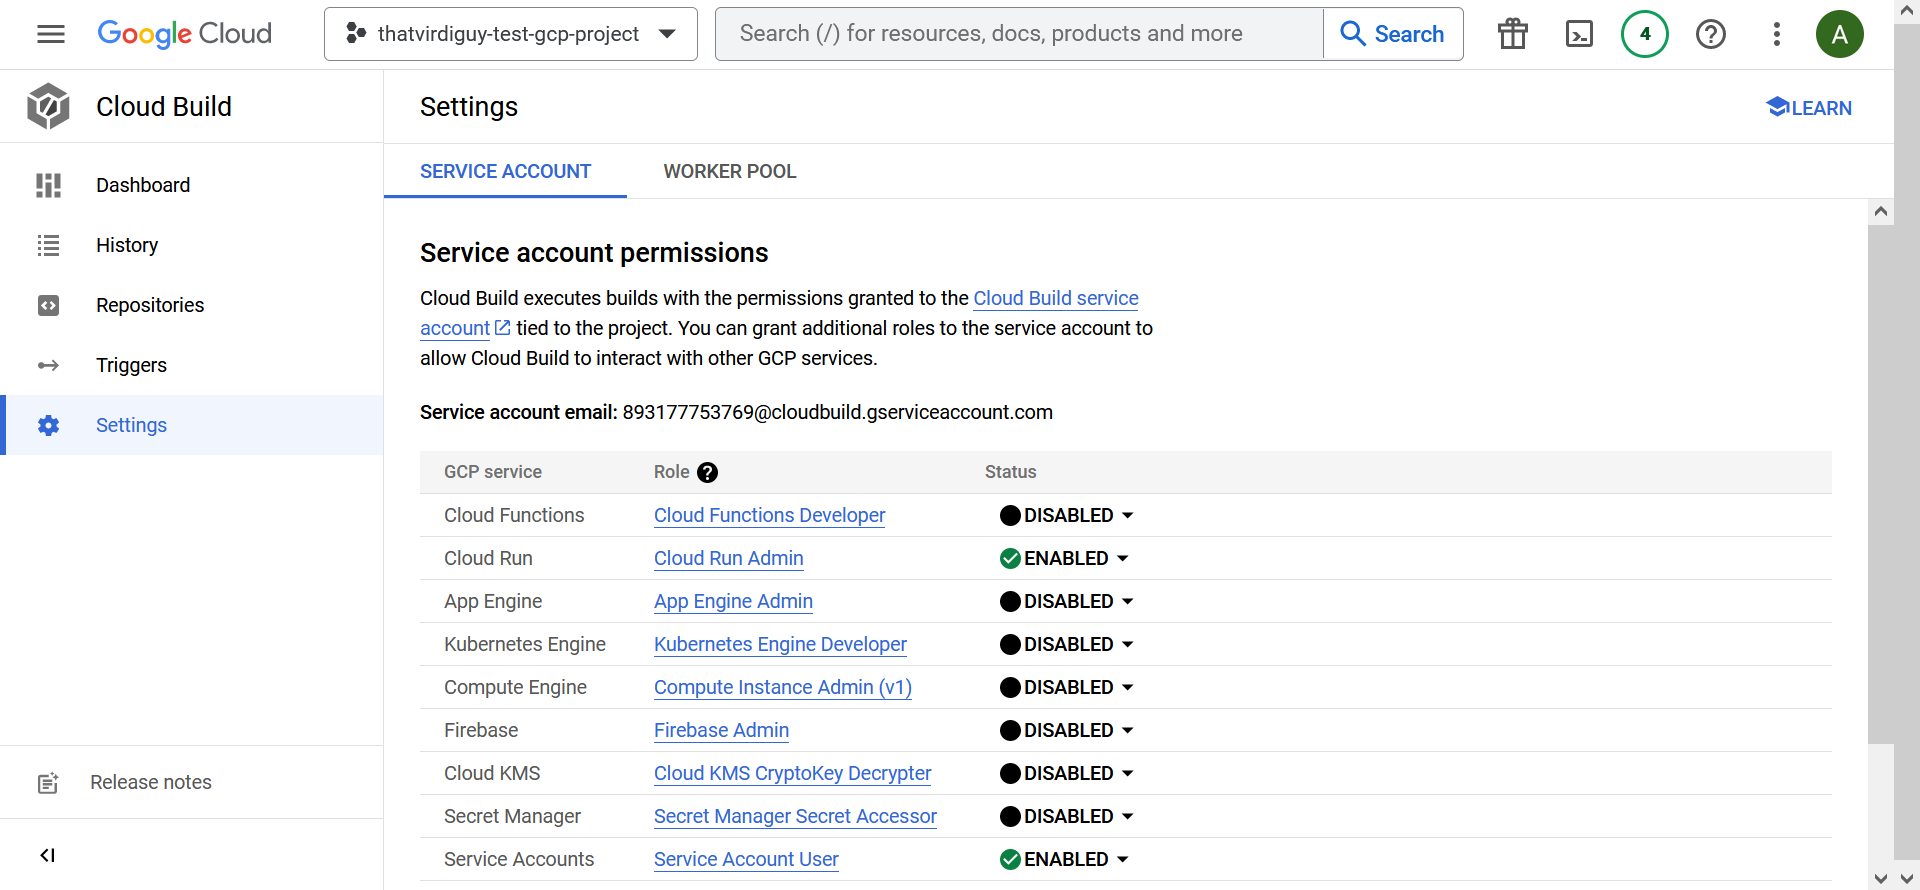
Turns out, you need to enable some permissions for the service account that is being used by Cloud Build.
I enabled those in the Settings tab of Cloud Build–
–and finally ended up with a successful build.
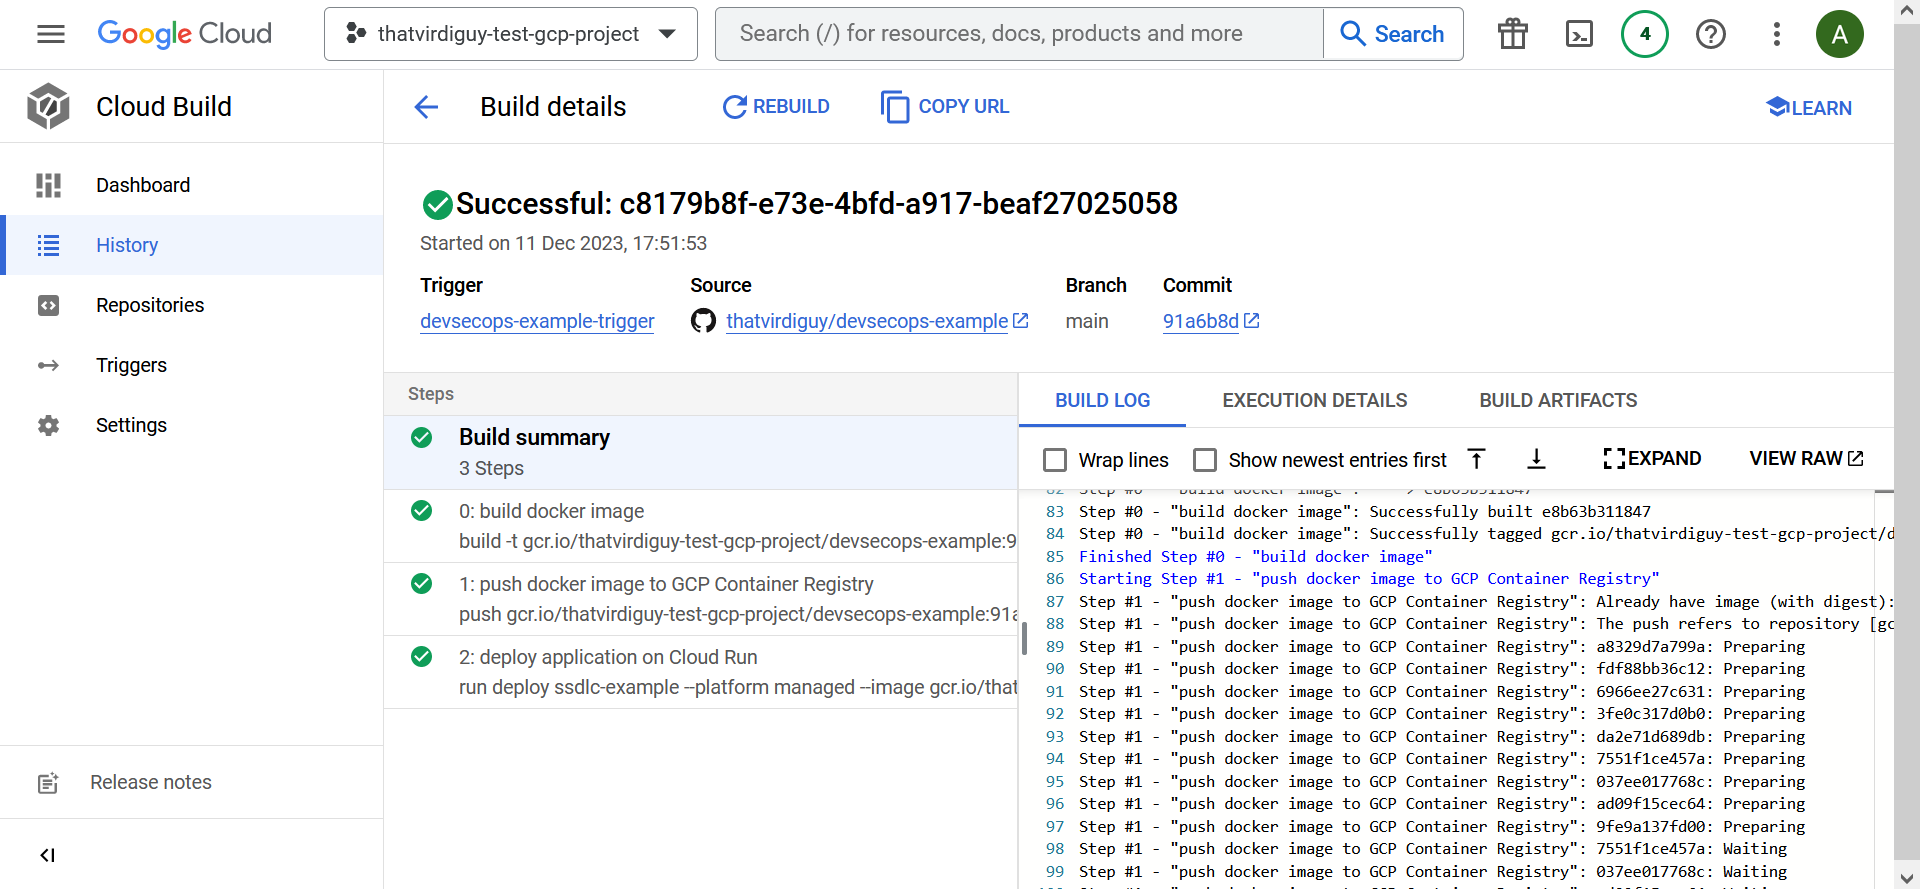
There is that Continuous Delivery setup we want!
05: Continuous Integration
The next stage in our little exercise is to set up Continuous Integration in place. To do so, we need to ensure adequate unit test coverage is place. Since our repository is hosted in GitHub, it makes sense to use their native capabilities, GitHub Actions, for the same.
Let’s define a unit test case first, though. I’ll be using SuperTest for it, so let’s go ahead and install that.
┌──(thatvirdiguy㉿kali)-[~/devsecops-example]
└─$ npm install supertest

added 21 packages, and audited 95 packages in 9s

15 packages are looking for funding
  run `npm fund` for details

found 0 vulnerabilities
We can also check that our package.json file has been updated, since we are now using a new dependency for our project.
┌──(thatvirdiguy㉿kali)-[~/devsecops-example]
└─$ cat package.json
{
  "name": "devsecops-example",
  "version": "1.0.0",
  "description": "WIP",
  "main": "index.js",
  "scripts": {
	"test": "echo \"Error: no test specified\" && exit 1"
  },
  "repository": {
	"type": "git",
	"url": "git+https://github.com/thatvirdiguy/devsecops-example.git"
  },
  "keywords": [],
  "author": "",
  "license": "ISC",
  "bugs": {
	"url": "https://github.com/thatvirdiguy/devsecops-example/issues"
  },
  "homepage": "https://github.com/thatvirdiguy/devsecops-example#readme",
  "dependencies": {
	"express": "^4.18.2",
	"mathjs": "^12.2.0",
	"supertest": "^6.3.3"
  }
}
To test the GET endpoint of our application, I will need to, first, create an app.test.js file and then define what response to expect when a call to that endpoint is made.
┌──(thatvirdiguy㉿kali)-[~/devsecops-example]
└─$ cat app.test.js
const request = require("supertest")
const baseURL = "https://devsecops-example-bquuzmv2ca-ew.a.run.app"

describe("GET /", () => {
  test("test the base URL", () => {
    expect("Hello, World!").toBe("Hello, World!")
  })
})
It is time to write our Continuous Integration workflow, which will let us define what actions will run and when. The what for us is to check out the latest code from the repository and perform unit testing and the when is, to line up with how we have defined our Cloud Build trigger, when new code is pushed into the main branch of our repository.
┌──(thatvirdiguy㉿kali)-[~/devsecops-example]
└─$ cat .github/workflows/test-workflows.yaml
name: devsecops-example

on:
  push:
	branches:
  	- main

jobs:
  unit-testing:
	runs-on: ubuntu-latest
	steps:
  	- uses: actions/checkout@v2
  	- name: Run Jest
    	  run: npm install && npm install -g jest-cli && npm test
Note that the last bit of the workflow installs and configures Jest using the runner’s shell.
You can then navigate to the Actions tab of your repository to see the results of the unit test:
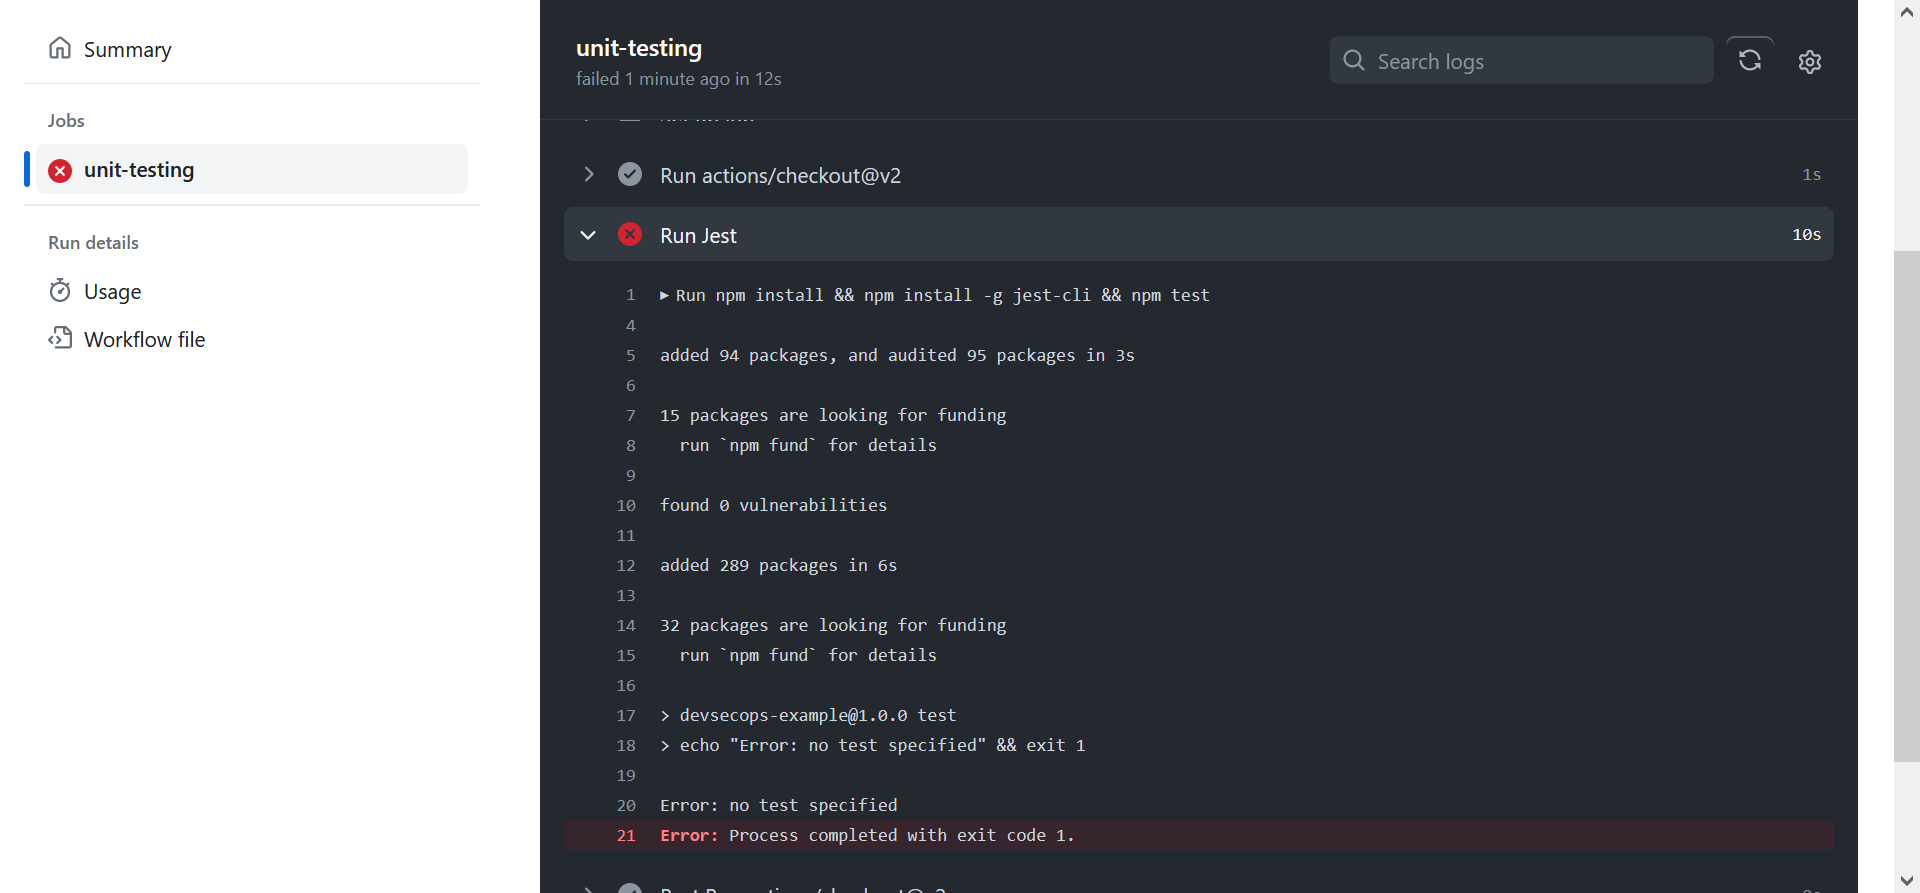
Which is failing because I forgot to update package.json to reflect the test script. Update it to replace–
  "scripts": {
	"test": "echo \"Error: no test specified\" && exit 1"
–with the following–
  "scripts": {
	"test": "jest"
–and push to main branch to try again.
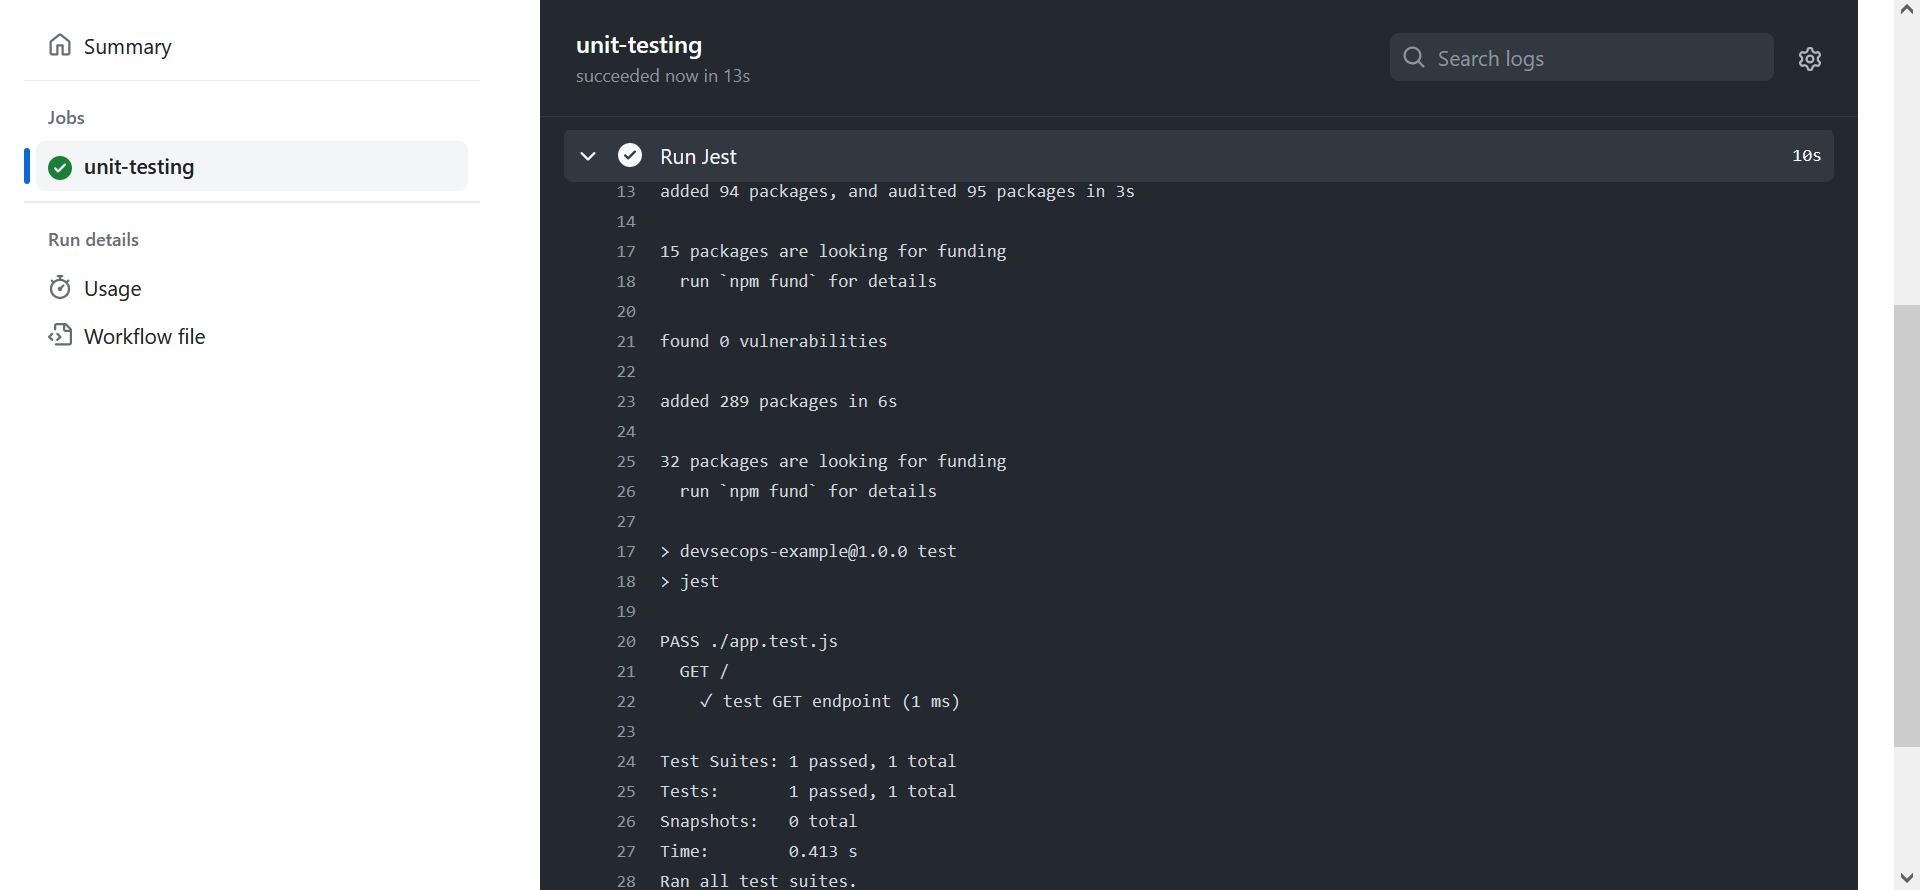
That’s the GET endpoint taken care of. Now to define unit test for the PUT endpoint.
We follow the same process. Define what to expect when the endpoint is called with certain values–
describe("POST /pythagoras/", () => {
  it("test POST endpoint", async () => {
	const response = await request(baseURL)
  	.post("/pythagoras")
  	.send({
    	a: 3,
    	b: 4
  	})
	expect(response.status).toBe(200);
	expect(response.body.hypotenuse).toBe(5);
  })
})
–and update the workflow file, and then push to the main branch to view the results.
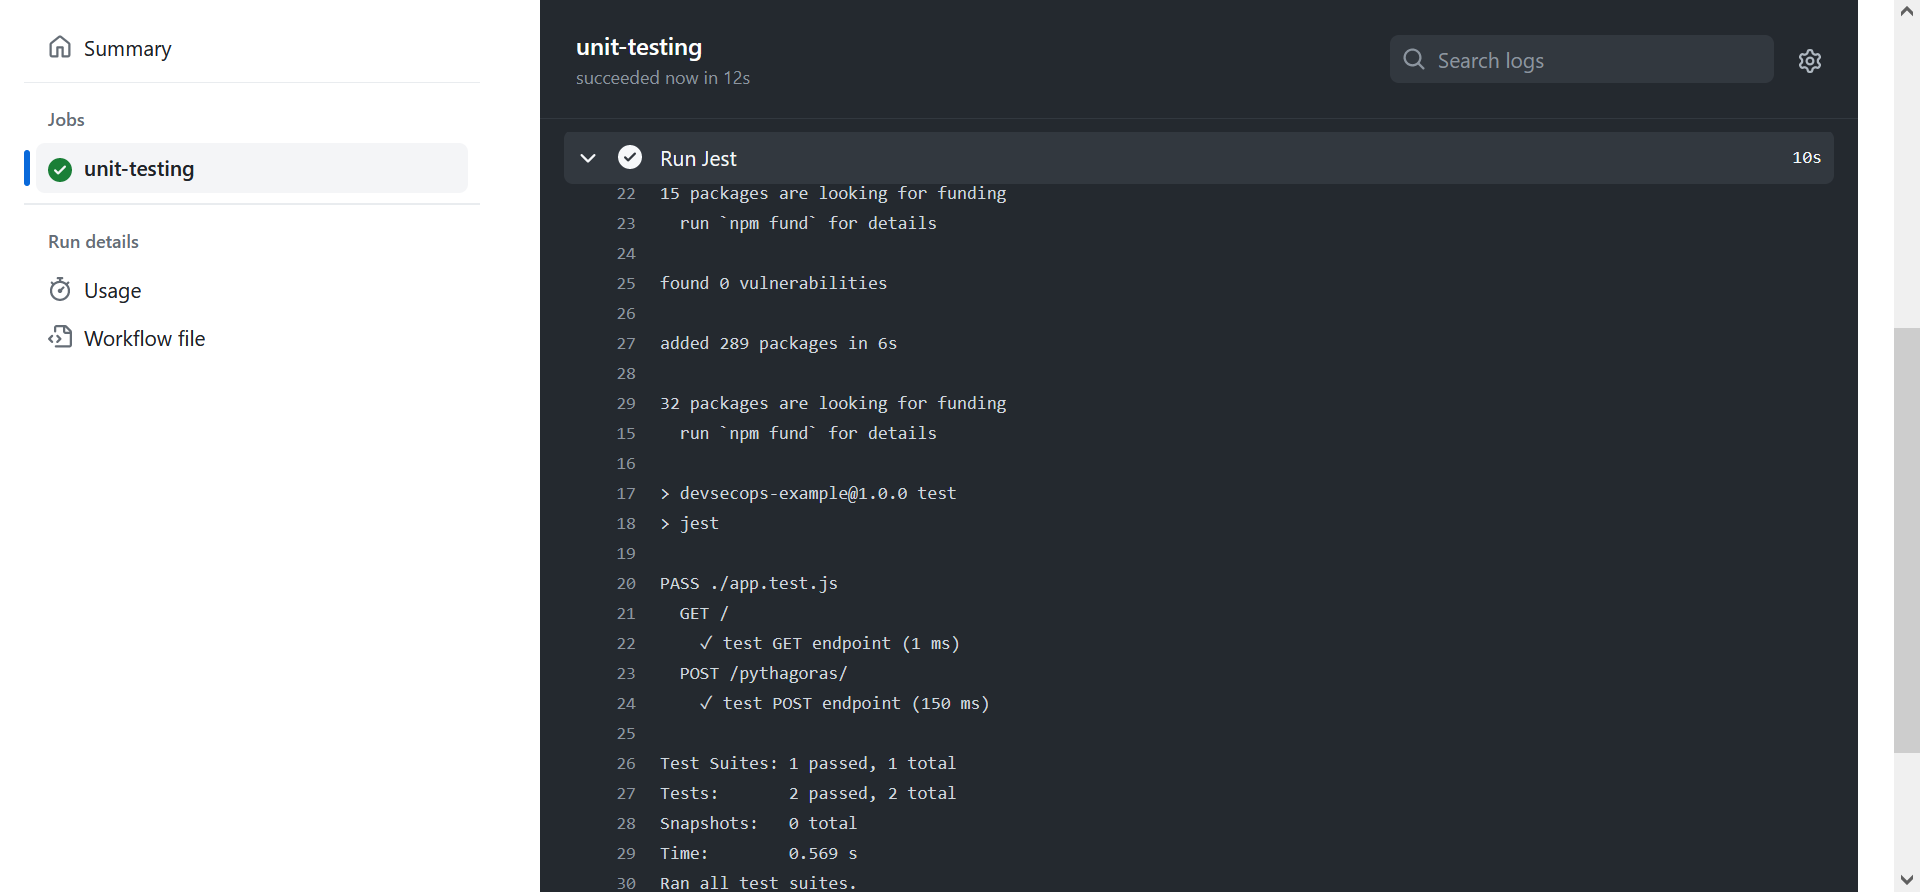
06: Securing the application build
Achieving comprehensive test coverage is essential, but it is equally crucial to conduct security checks to ensure that our code is free from known vulnerabilities. We will be adding two security checks in our workflow file, one intended to perform Static Application Security Testing (SAST), for which we will use Polaris, and the other intended to perform Software Composition Analysis (SCA), for which we will use Black Duck.
For the SAST test, log on to the Polaris console and create an access token that you will use during this step. For this exercise, I will be using Polaris CLI, downloading its zip file off the server and running a full scan via it. Refer to the documentation for details on how to use the CLI to capture build outputs and analyze the artifacts.
  sca:
	runs-on: ubuntu-latest
	steps:
  	- name: Download Polaris CLI
    	uses: carlosperate/download-file-action@v1.0.3
    	with:
      	file-url: $
      	file-name: polaris_cli-linux64.zip
  	- name: Unzip Polaris CLI
    	run: unzip polaris_cli-linux64.zip -d ./polaris_cli
  	- name: Polaris Full Scan
    	env:
      	POLARIS_ACCESS_TOKEN: $
      	POLARIS_SERVER_URL: $
    	run: |
      	export PATH=$PATH:$(pwd)/polaris_cli/$(ls ./polaris_cli)/bin
      	polaris capture
      	polaris analyze -w
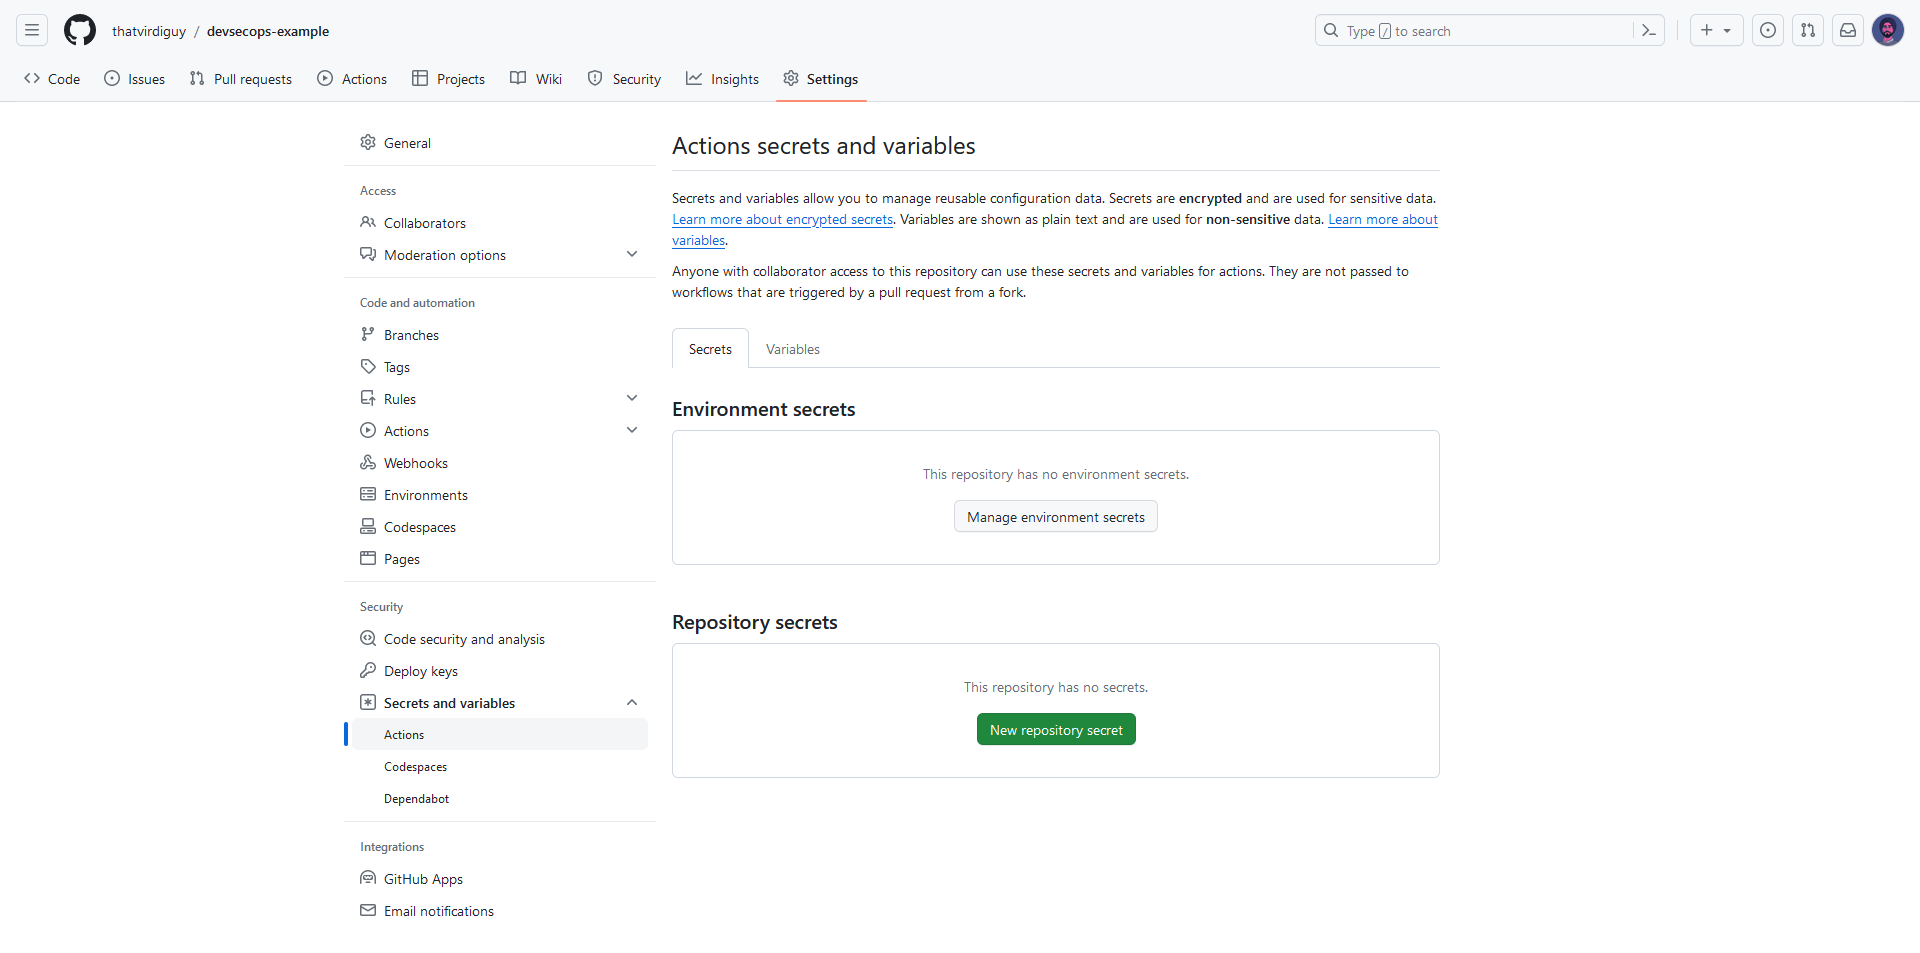
Note that we are passing access tokens and sensitive data as GitHub secrets in the workflow file. This can be done by navigating to the Settings tab of the repository and adding a repository secret under the Secrets and variables pane.
We will be, essentially, following the same steps for the SCA test. But, unlike, Polaris, where we were downloading the CLI and executing the commands on the runner, for Black Duck, we will be using Detect Action from Synopsys to integrate its capabilities into our workflows. This would, of course, also need an access token with the appropriate permissions.
  sast:
	runs-on: ubuntu-20.04
	permissions: write-all
	steps:
  	- uses: actions/checkout@v2
  	- name: Run Synopsys Detect
    	uses: synopsys-sig/detect-action@v0.3.0
    	with:
      	scan-mode: RAPID
      	detect-version: 8.9.0
      	blackduck-url: $
      	blackduck-api-token: $
Once you have both the security tests in place, we can push the new code into the main branch of our repository, thereby triggering a build, and view the results on GitHub.
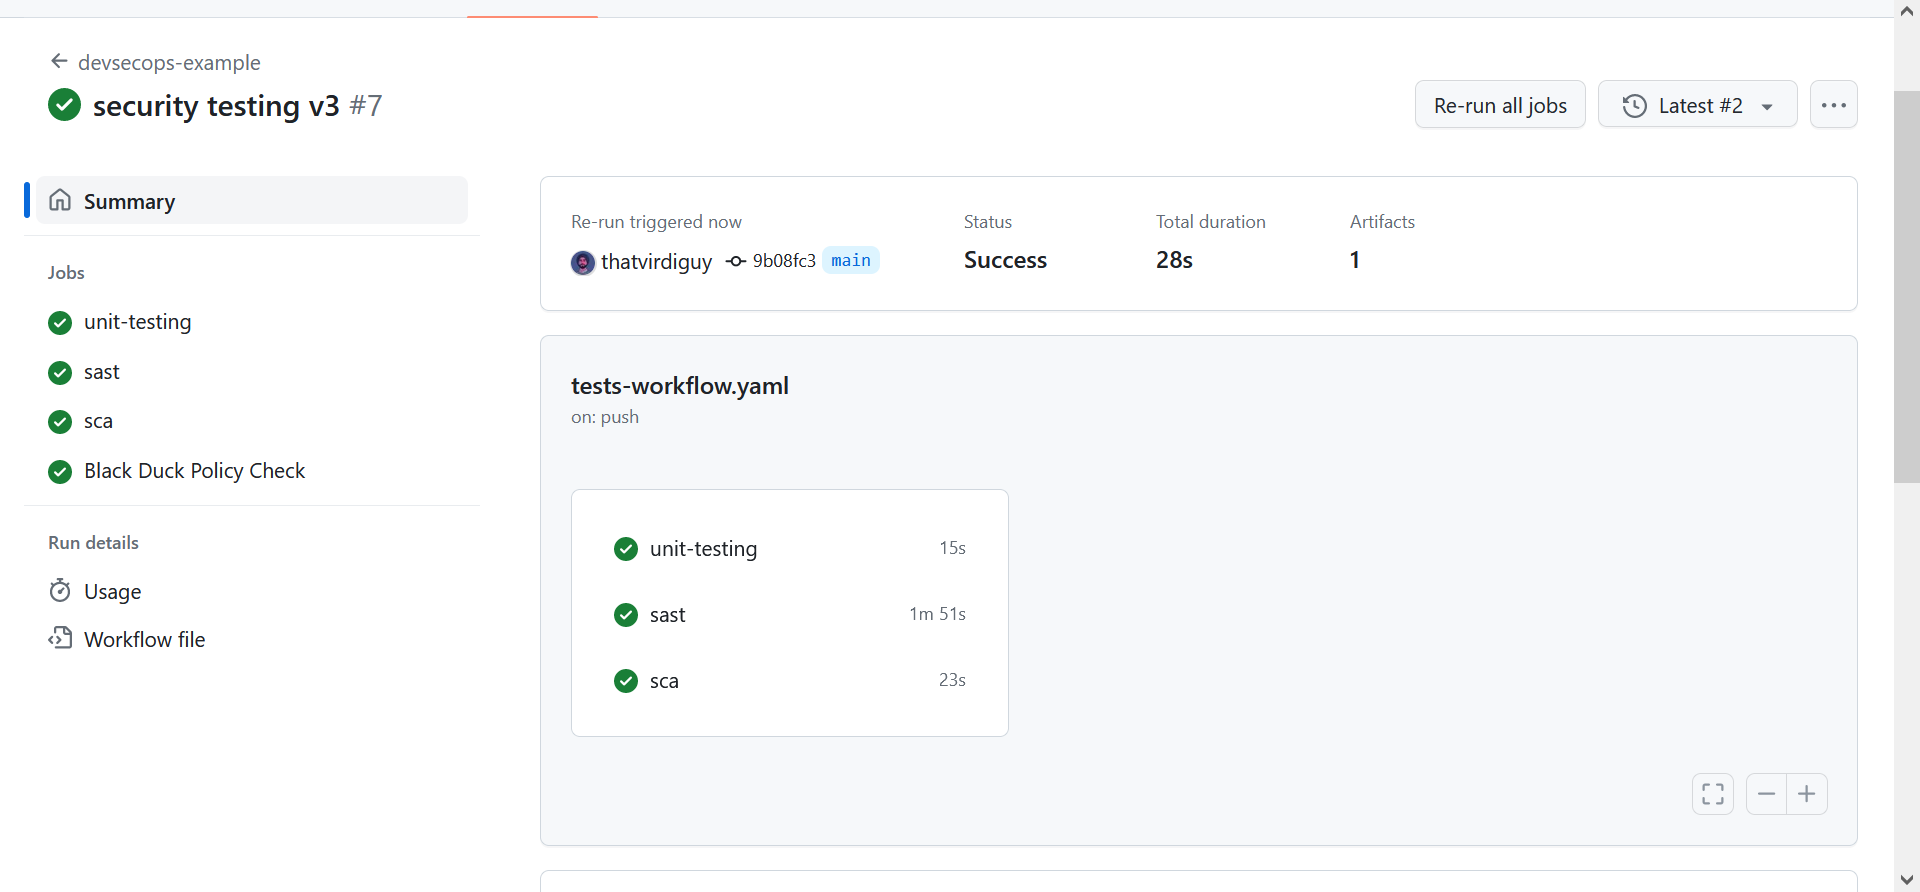
Interesting footnote, though. For the Black Duck workflow, I kept getting the following error–
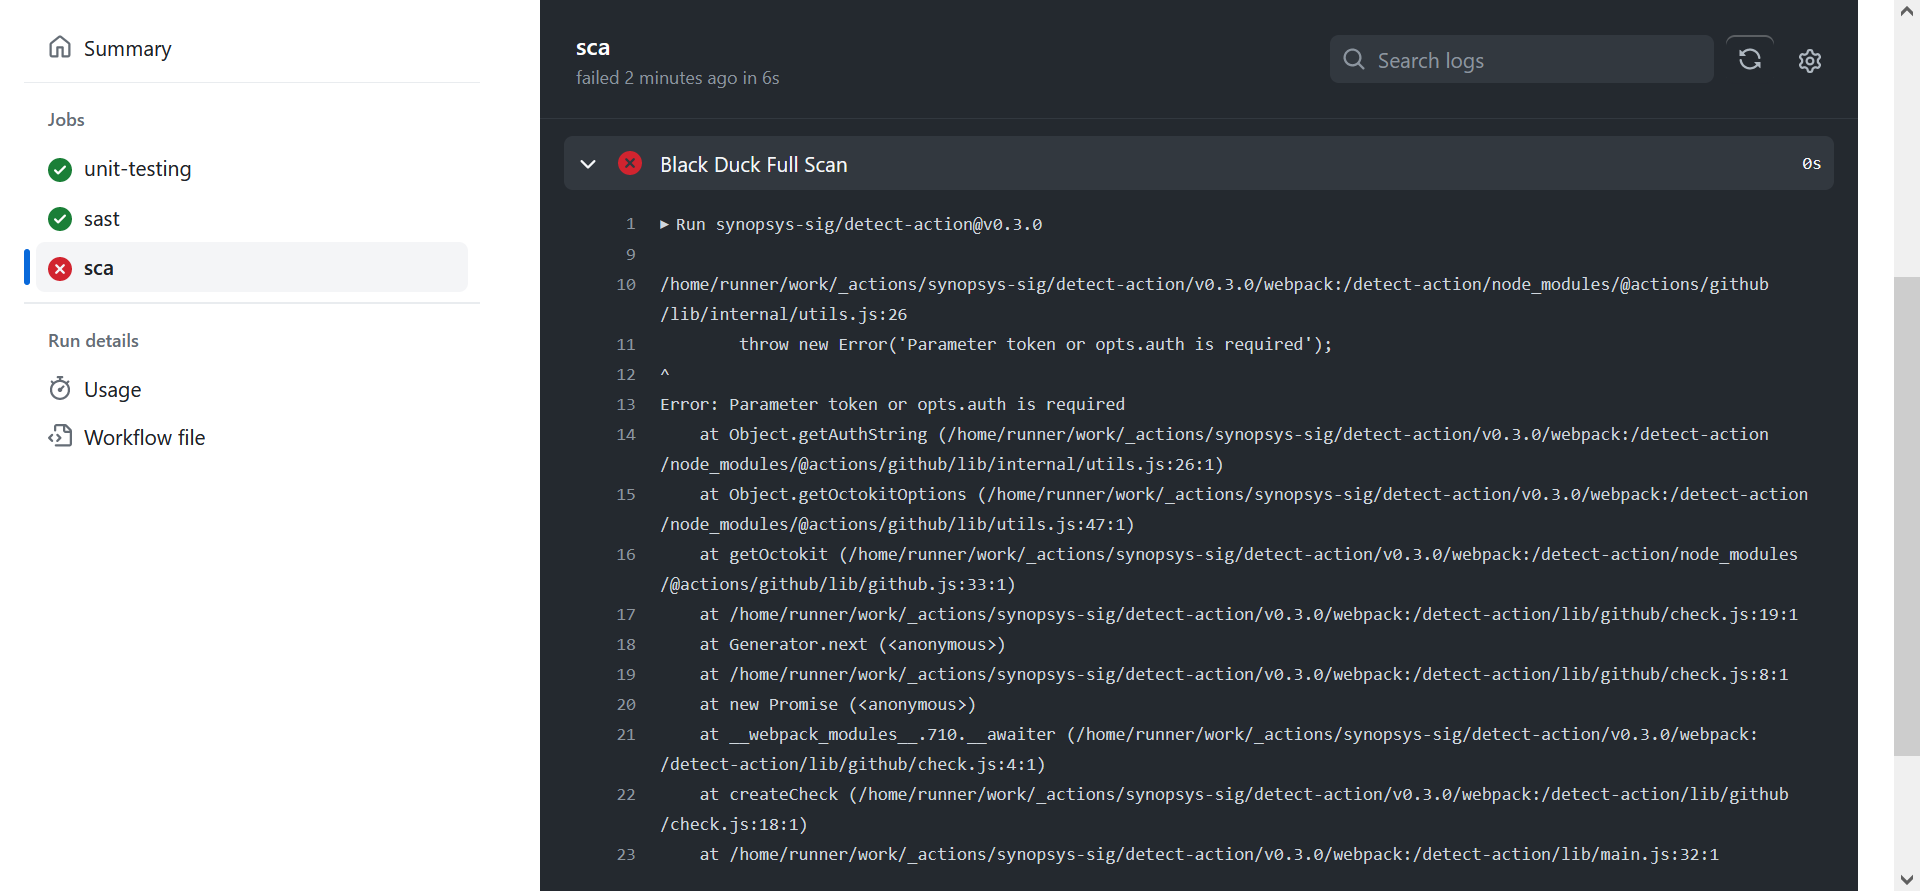
–and that was only resolved after I added github-token as another parameter for detect-action, which, if you refer to the documentation is actually supposed to be optional.
That is it for this exercise, though. Of course, there can be further additions to this pipeline, both from a DevOps perspective – for example, we could look into increasing the availability of this application – and from a DevSecOps perspective – for example, we could set up alerts to facilitate Continous Monitoring through logging and analysis.
Perhaps next time…
